Build a plantar fasciitis recovery plan that does more than quiet a sore heel: progressively rebuild the foot's ability to handle standing, walking, work, and exercise, while using red and near-infrared light as a recovery layer between loading sessions.
Stop treating the fascia as if it only needs to be loosened
When the first steps out of bed hurt, it is natural to reach for stretching, a massage ball, or anything that makes the sole feel less tight. Those tools can still be useful. The problem is letting temporary relief become the entire plan.
The plantar fascia helps support the arch and transfer force as you move. If daily demand keeps exceeding what the foot can currently tolerate, repeatedly “loosening” the area does not rebuild the missing capacity. A stronger recovery plan has two jobs:
- Make symptoms manageable enough to keep moving.
- Gradually raise the amount of load the foot can accept.
That is the framework for everything that follows. Recovery is not an endless attempt to protect the heel. It is a measured return to the loads your life actually requires. But loading is only the first half of adaptation: after the exercise ends, the tissue still has to process that signal, restore energy, regulate the local response, and prepare for the next exposure.

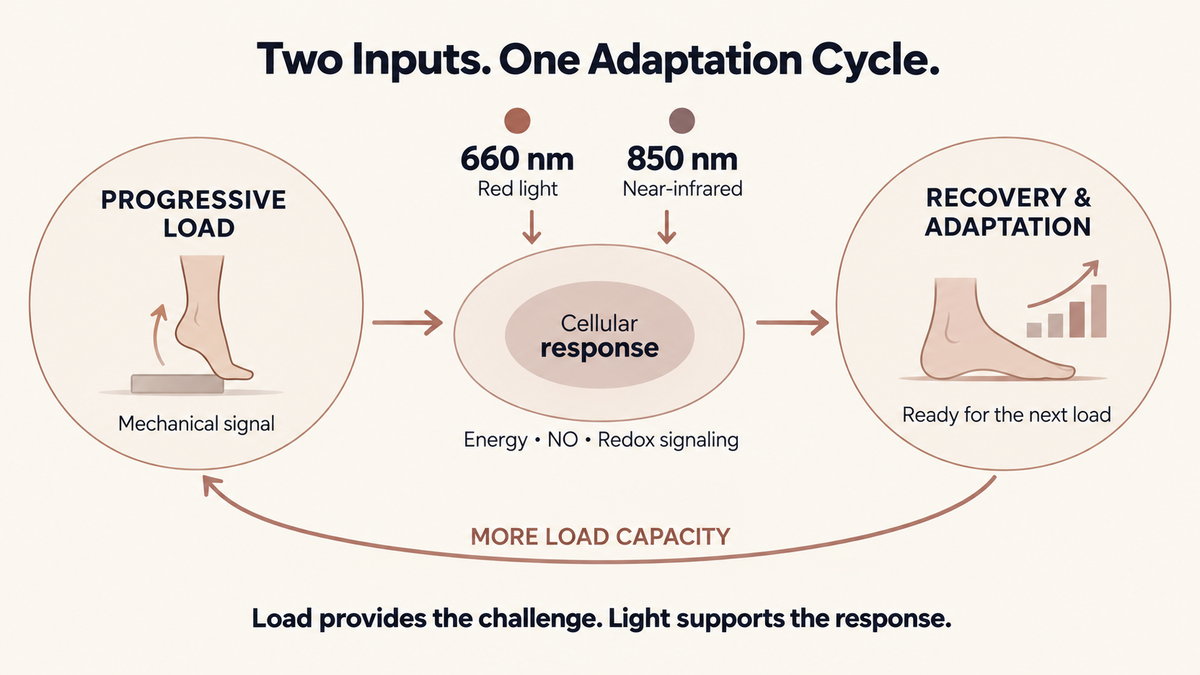
Loading provides the signal. Light supports the response.
This is the underlying logic that connects red light with progressive loading. A heel raise creates mechanical tension through the foot and calf. That mechanical input tells the system what it needs to become better able to handle. The adaptation itself develops during the recovery period that follows.
Red and near-infrared light add a photochemical input rather than another mechanical one. In the leading model of photobiomodulation, light-sensitive molecules inside cells—including cytochrome c oxidase in mitochondria—absorb photons. This can influence electron transport, ATP production, nitric-oxide availability, and redox signaling: processes involved in cellular energy use, circulation, inflammatory regulation, and repair signaling. In plain English, the light is not stretching the fascia. It is supporting the biological environment in which the foot recovers from being loaded.

That makes red light fundamentally different from the tools many people have already tried. Stretching changes position and tissue tension. Massage applies pressure. TENS uses electrical stimulation to help manage pain signals. Photobiomodulation delivers red and near-infrared light energy into tissue to influence cell signaling. It adds a recovery input without requiring more pressure on an already sensitive heel.
Red light and near-infrared light also contribute differently to coverage. Visible red light is readily absorbed closer to the surface, while near-infrared wavelengths generally travel farther through tissue. Actual delivery still depends on wavelength, device output, tissue, and placement, which is why close, repeatable positioning over the heel and sole matters more than simply seeing a bright glow.
Clinical guidance places low-level light or laser therapy inside a broader plantar-fasciitis rehabilitation program for short-term pain reduction. The practical lesson is not to choose between light and exercise. It is to use light during the recovery side of the same cycle that loading begins. For a deeper review of the outcomes research, read Red Light Therapy for Plantar Fasciitis: Does It Really Help?
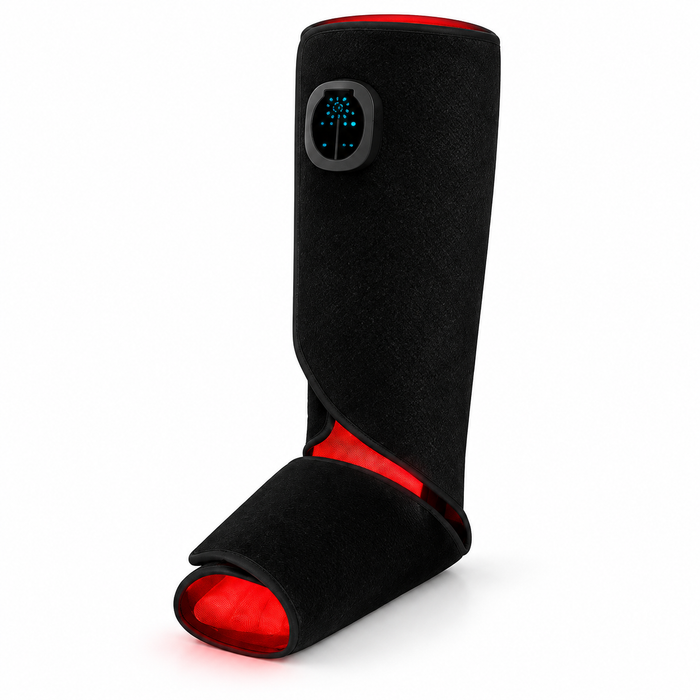
At home, placement is what turns that biological logic into a usable routine. A contact-style wrap keeps the light-facing surface close to the sole and heel instead of asking you to hold your foot at a fixed distance from a panel. SissWrap Foot combines 660 nm red light and 850 nm near-infrared light in a cordless wrap designed to cover the sole, heel, and ankle, with five modes and three brightness levels. That coverage lets the light-supported recovery step sit naturally between one loading session and the next.
If you want to see how the evidence, sole-and-heel coverage, and a home recovery pathway fit together before choosing a device, explore the SissWrap Foot plantar fasciitis recovery overview.
Why the big toe changes how the fascia is loaded
When the big toe bends upward, the plantar fascia is tensioned around the front of the foot. The arch rises and the foot becomes a firmer lever for push-off. This is the windlass mechanism.
The distinction matters: the fascia does not actively contract like a muscle. The foot and calf muscles create the movement, while the fascia is tensioned as part of the system. A rolled towel under the toes uses this mechanism to increase the challenge during a heel raise.

Build from tolerable load to high load
The towel-supported heel raise became well known through a randomized trial led by Michael Rathleff. Participants in the strength group performed unilateral heel raises with a towel under the toes every other day. At three months, that group reported better foot function than the stretching group; the longer follow-up did not show a lasting difference between groups. The useful takeaway is not that one exercise is a universal cure. It is that progressive high-load training is a credible path for rebuilding function.
A practical progression looks like this:
- Start with the load you can control. If ordinary standing and walking are already highly irritable, begin with a seated heel raise or a supported two-leg version.
- Earn a smooth full-bodyweight heel raise. Keep the heel path steady and the knee aligned. Avoid bouncing through the painful range.
- Add the rolled towel. Place it under the toes so the big toe lifts comfortably, then rise slowly, pause, and lower with control.
- Progress one variable at a time. Move from two legs to one leg, then add external load only when the current version is controlled and repeatable.
- Return to the task that matters. Strength in isolation is not the finish line. Gradually restore the walking, standing, running, or work demands you need.

How to combine your light session with loading
The mechanism becomes useful only when it becomes a repeatable routine: load the foot, give it a recovery window, observe the response, and then decide whether it is ready for more. There is no need to turn that sequence into a complicated timing experiment.
This section explains how to sequence the two inputs. For device-specific placement, settings, and session guidance, use the separate step-by-step red light guide for plantar fasciitis.
1. Place the light where the symptoms and workload meet
Center the light-facing area over the sole and heel, with secure contact that is comfortable rather than compressive. Use the device on clean, bare skin when the product instructions call for it. Follow the current product guidance for session settings instead of copying a dose from a clinical laser study, because devices and output differ.
2. Use loading days as the anchor
A simple default is to perform the light session after the strength work or later the same day. If using light first makes the heel more comfortable for controlled movement, that can also be a workable routine. Consistency and correct placement matter more than chasing a supposedly perfect minute.
3. Leave recovery space between hard loading sessions
The Rathleff program used every-other-day strength training. That rhythm gives the foot a clear loading stimulus followed by recovery time. On the days between, keep normal movement within a manageable range, use light according to the product guidance, and avoid sudden spikes in standing, walking, hills, or running.
4. Progress the exercise—not every variable at once
Do not increase heel-raise load, walking volume, and running intensity in the same step. Change one major demand, watch the next-morning response, and then decide whether to hold, advance, or reduce.
A recovery layer designed for the whole foot
SissWrap Foot brings red and near-infrared light into close contact with the sole, heel, and ankle in a cordless format, so a light session can fit around strength work and daily life.
Measure whether capacity is returning
A single pain score can be noisy. Track a small set of functional signals instead:
- How the first steps of the morning feel.
- How long you can walk or stand before symptoms alter your gait.
- Which heel-raise variation you can complete with control.
- How the foot feels later that day and the following morning.
- Whether you are moving closer to your real goal: work, travel, running, or sport.
The trend should show that the foot is doing more with a manageable response. If performance is falling and the next-day reaction keeps escalating, the plan needs less load, a slower progression, or a clinical reassessment—not more determination.
Stretching and rolling can stay—just give them the right job
Calf stretching, plantar-fascia-specific stretching, massage, and a ball under the foot can help manage stiffness or make movement feel easier. Keep them when they serve that purpose. They simply should not crowd out resistance training and the gradual return to real activity.
Likewise, footwear, temporary activity changes, taping, or orthoses may reduce irritation while capacity is being rebuilt. These are bridges that help you train and function; they are not substitutes for restoring what the foot can handle.
When to get the diagnosis checked
Plantar heel pain is not always plantar fasciitis. Seek professional assessment if the pain followed a significant injury, you cannot bear weight normally, the foot is markedly swollen or hot, you have numbness or progressive weakness, there is a wound or skin change, or the symptoms keep worsening despite a sensible reduction in load. People with diabetes, reduced sensation, circulation problems, or a recent procedure should get individualized guidance before changing an exercise or device routine.
Use comfort to make progress—not to avoid load
The strongest home plan gives each input a clear job. Progressive loading tells the foot what capacity it needs to build. Red and near-infrared light supports the cellular recovery environment in which the foot responds to that demand. Together they create a coherent cycle: stimulus, recovery, adaptation, and gradual progression.
Start at a level you can control, recover, and repeat. Then increase the demand step by step. If you are still deciding between a panel, wrap, or foot-specific device, see Best Red Light Therapy Device for Plantar Fasciitis. For broader foot-pain questions, visit Red Light Therapy for Foot Pain: What the Evidence Says.
Sources
- Heel Pain—Plantar Fasciitis: Revision 2023 clinical practice guideline, APTA Orthopedics / Journal of Orthopaedic & Sports Physical Therapy.
- Rathleff MS et al. High-load strength training improves outcome in patients with plantar fasciitis, Scandinavian Journal of Medicine & Science in Sports.
- Bolgla LA, Malone TR. Plantar fasciitis and the windlass mechanism, Journal of Athletic Training.
- Hamblin MR. Mechanisms and mitochondrial redox signaling in photobiomodulation, Photochemistry and Photobiology.
- Hamblin MR. Mechanisms and applications of the anti-inflammatory effects of photobiomodulation, AIMS Biophysics.